使用 Tensorflow 2.0 在深度学习中进行迁移学习
概述
TensorFlow 是当今最顶尖的深度学习库之一。之前发布的指南《使用 ResNet 进行迁移学习》探讨了 Pytorch 框架。本指南将使用 TensorFlow 库进行迁移学习 (TL)。TensorFlow 框架构建模型流畅且简单。
在本指南中,您将学习如何通过TensorFlow Hub (TFHub)使用预先训练的 MobileNet 模型,TFHub 是一个用于发布、发现和使用机器学习模型可重用部分的库。
您将使用 Kaggle 的数据集来预测图像描绘的是外星人还是掠食者。单击此处下载数据集。
为什么选择 MobileNet?
计算机视觉网络有责任让更深的网络实现更高的准确率。简而言之,模型越深,优化就越困难。对于紧凑型应用,由于系统的计算和能力有限,维持操作数量变得不方便。
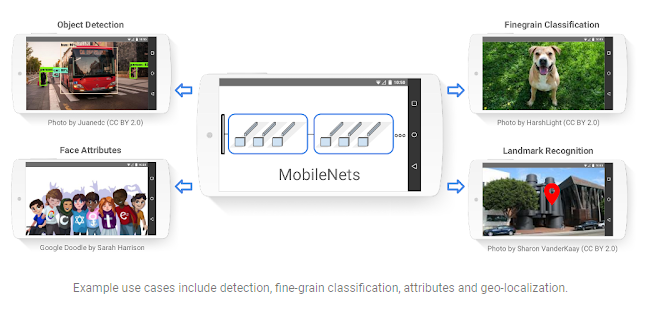
MobileNet 的引入是为了缓解这些问题。它有两个版本,MobileNet-V1 和 MobileNet-V2。本指南将坚持使用 MobileNet-V2。与其他模型(例如 Inception)相比,MobileNet 在延迟、大小和准确性方面表现出色。为了构建更轻量的深度神经网络,它使用了深度可分离卷积 (DSC)层。
MobileNet 架构
TL 的主要目的是快速实现模型。MobileNet 架构不会有任何变化。该模型将迁移从执行相同任务的不同数据集中学到的特征。
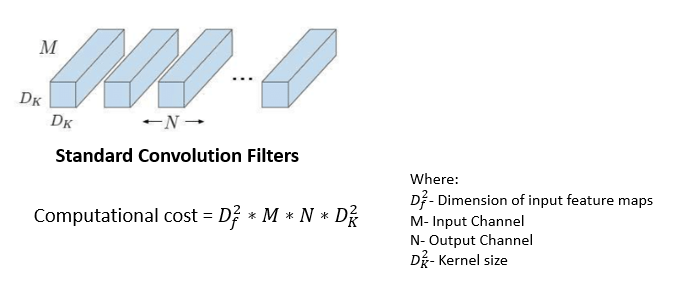
在标准卷积层中应用复合函数时,卷积核会应用于输入图像的所有通道,并将加权和滑动到下一个像素。MobileNet 仅在第一层使用此标准卷积滤波器。
深度可分离卷积
下一层是深度可分离卷积,它是深度卷积和逐点卷积的组合。
深度卷积
与标准卷积不同,深度卷积在每个输入通道上分别映射一个卷积。输出图像的通道维度(3 RGB)将与输入图像的通道维度相同。
来源:热应力——高级理论与应用
逐点卷积
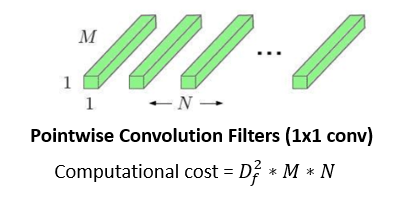
这是过滤阶段的最后一个操作。它与常规卷积大致相似,但具有 1x1 过滤器。逐点卷积背后的理念是合并深度卷积创建的特征,从而创建新的特征。
来源:热应力——高级理论与应用
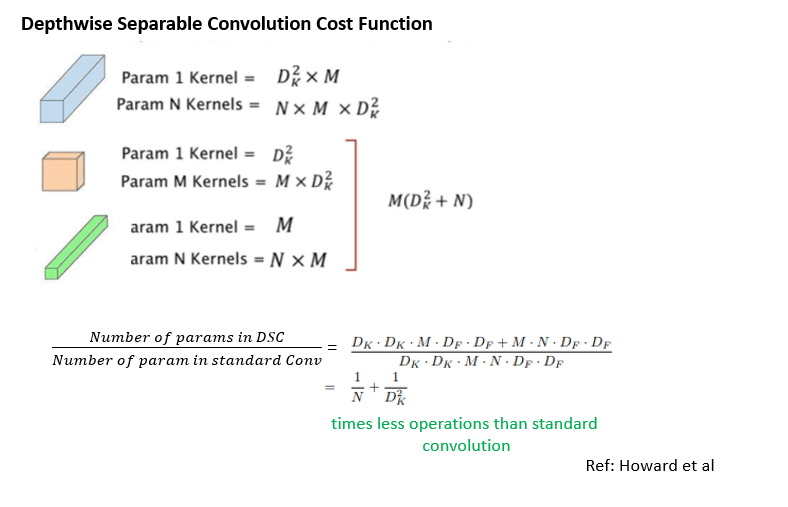
DSC 的成本函数是深度卷积和逐点卷积的成本之和。
除此之外,MobileNet 还提供了两个参数来进一步减少操作:
- 宽度乘数:引入变量 α ∈ (0, 1) 来减少通道数。它不会生成 N 个通道,而是生成 αxN 个通道。如果您需要较小的模型,它将选择 1。
- 分辨率乘数:引入变量 ρ ∈ (0, 1),用于将输入图像的尺寸从 244、192、160px 或 128px 减小。1 是图像尺寸 224px 的基准。
您可以在 224x224 图像上训练模型,然后在 128x128 图像上使用它,因为 MobileNet 使用全局平均池化并且不会展平图层。
MobileNet-V2
MobileNet-V2 预训练版本可在此处获得。其权重最初是通过在用于图像分类的 ILSVRC-2012-CLS 数据集(Imagenet)上进行训练获得的。
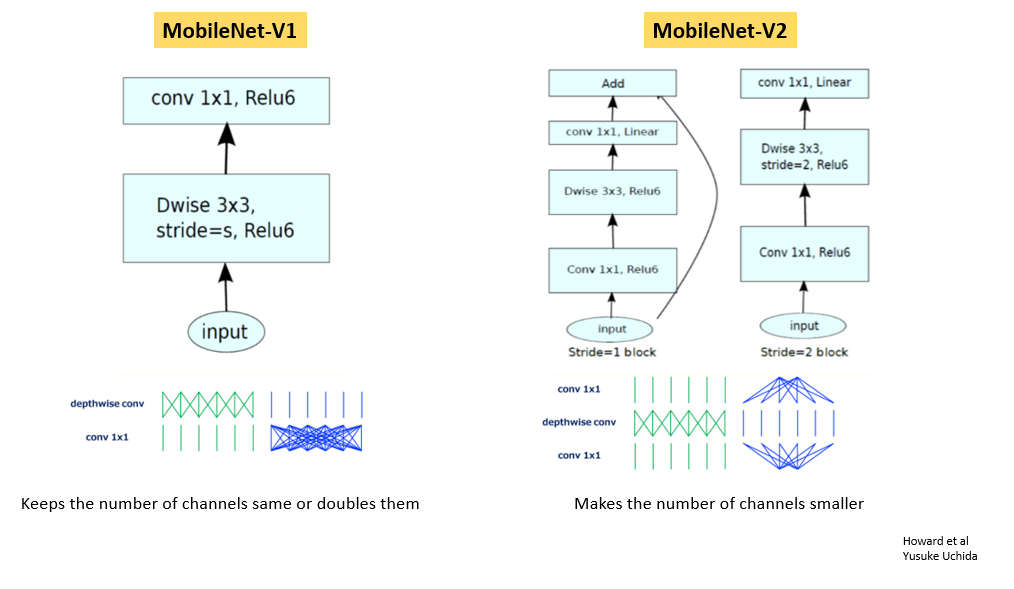
MobileNet-V1 和 V2 中的基本构建块:
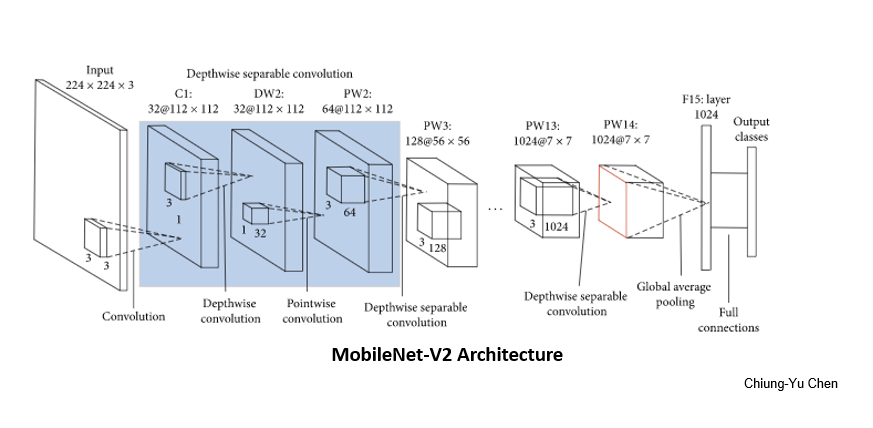
最终的MobileNet-V2架构如下所示:
https://www.hindawi.com/journals/misy/2020/7602384/
构建 MobileNet 模型
现在您已经了解了 MobileNet 的元素,您可以从头开始构建模型以使其更加定制或使用预先训练的模型并节省一些时间。
让我们看看代码是如何工作的。从导入必要的库开始。
      import os
import tensorflow as tf
import tensorflow_hub as hub
from tensorflow.keras import layers, Sequential
import tensorflow.keras.backend as K
from tensorflow.keras.preprocessing import image
from tensorflow.keras.preprocessing.image import ImageDataGenerator
from tensorflow.keras.callbacks import EarlyStopping
import pathlib
import matplotlib.pyplot as plt
import seaborn as sns
sns.set()
import numpy as np
      train_root = "../alien-vs-predator-images/train"
test_root = "../alien-vs-predator-images/validation"
      image_path = train_root + "/alien/103.jpg"
def image_load(image_path):
    loaded_image = image.load_img(image_path)
    image_rel = pathlib.Path(image_path).relative_to(train_root)
    print(image_rel)
    return loaded_image
测试上述功能:
image_load(image_path)
数据似乎已准备就绪。但要使用它,您需要将其加载到模型中。
      train_generator = ImageDataGenerator(rescale=1/255)
test_generator = ImageDataGenerator(rescale=1/255)

train_image_data = train_generator.flow_from_directory(str(train_root),target_size=(224,224))
test_image_data = test_generator.flow_from_directory(str(test_root), target_size=(224,224))
TFHub 也分发没有顶层分类层的模型。它使用feature_extractor进行迁移学习。
      # Model-url
feature_extractor_url = "https://tfhub.dev/google/imagenet/mobilenet_v2_100_224/feature_vector/2"
      def feature_extractor(x):
  feature_extractor_module = hub.Module(feature_extractor_url)
  return feature_extractor_module(x)

IMAGE_SIZE = hub.get_expected_image_size(hub.Module(feature_extractor_url))
IMAGE_SIZE
      for image_batch, label_batch in train_image_data:
    print("Image-batch-shape:",image_batch.shape)
    print("Label-batch-shape:",label_batch.shape)
    break
      for test_image_batch, test_label_batch in test_image_data:
    print("Image-batch-shape:",test_image_batch.shape)
    print("Label-batch-shape:",test_label_batch.shape)
    break
feature_extractor_layer = layers.Lambda(feature_extractor,input_shape=IMAGE_SIZE+[3])
冻结特征提取器中的变量,以便训练仅修改新的分类器层。
feature_extractor_layer.trainable = False
      model = Sequential([
    feature_extractor_layer,
    layers.Dense(train_image_data.num_classes, activation = "softmax")
    ])
model.summary()
接下来初始化TFHub模块。
      sess = K.get_session()
init = tf.global_variables_initializer()

sess.run(init)
测试单张图像。
      result = model.predict(image_batch)
result.shape
(32, 2)
下一步是使用优化器编译模型。
      model.compile(
    optimizer = tf.train.AdamOptimizer(),
    loss = "categorical_crossentropy",
    metrics = ['accuracy']
    )
创建自定义回调来可视化每个时期的训练进度。
      class CollectBatchStats(tf.keras.callbacks.Callback):
  def __init__(self):
    self.batch_losses = []
    self.batch_acc = []

  def on_batch_end(self, batch, logs=None):
    self.batch_losses.append(logs['loss'])
    self.batch_acc.append(logs['acc'])

# Early stopping to stop the training if loss start to increase. It also avoids overfitting.
es = EarlyStopping(patience=2,monitor="val_loss")
免责声明:本内容来源于第三方作者授权、网友推荐或互联网整理,旨在为广大用户提供学习与参考之用。所有文本和图片版权归原创网站或作者本人所有,其观点并不代表本站立场。如有任何版权侵犯或转载不当之情况,请与我们取得联系,我们将尽快进行相关处理与修改。感谢您的理解与支持!

















请先 登录后发表评论 ~