配置 ASP.NET Identity
介绍
ASP.NET 中的身份配置可能相当令人困惑,特别是当您想要自定义设置属性时。
当您使用 Entity Framework 的代码优先方法时,您可以完全控制用户身份选项。但是,当开发人员处理较大的项目时,他们通常更喜欢使用表优先方法,即创建数据库,然后在 API 中使用信息,最后以在前端有意义的方式对其进行调整。
因此,采用混合方法配置身份可能效果最佳。
示例问题
假设我们虚构的软件公司的客户是一家大型汽车制造商。他们在世界各地有很多商店。他们的系统的第一个也是最重要的功能应该是用户管理。它应该有不同类型的用户:管理员、商店经理和卖家。
代码
如果您在任何代码上遇到困难,请参阅我的项目工作版本作为参考。
设置数据库
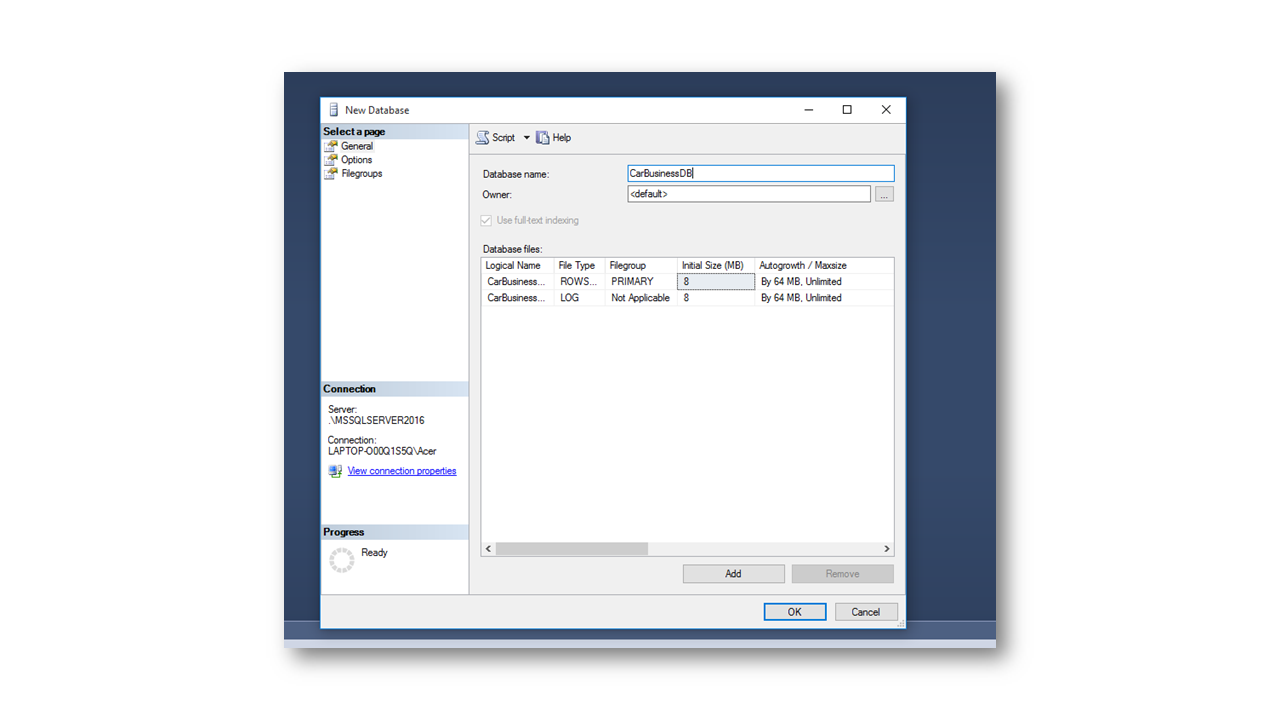
在我们定义了应用程序中用户应具有的主要属性之后,就该开始开发系统架构了。由于它可以快速扩展并且数据库设计很重要,因此我们将使用表优先方法。第一步是创建数据库。对于本文,我将结合使用 SQL Server 2016 和 SQL Management Studio。
下面是一个 SQL Management Studio 图片,可帮助您从空白数据库开始。
创建新项目
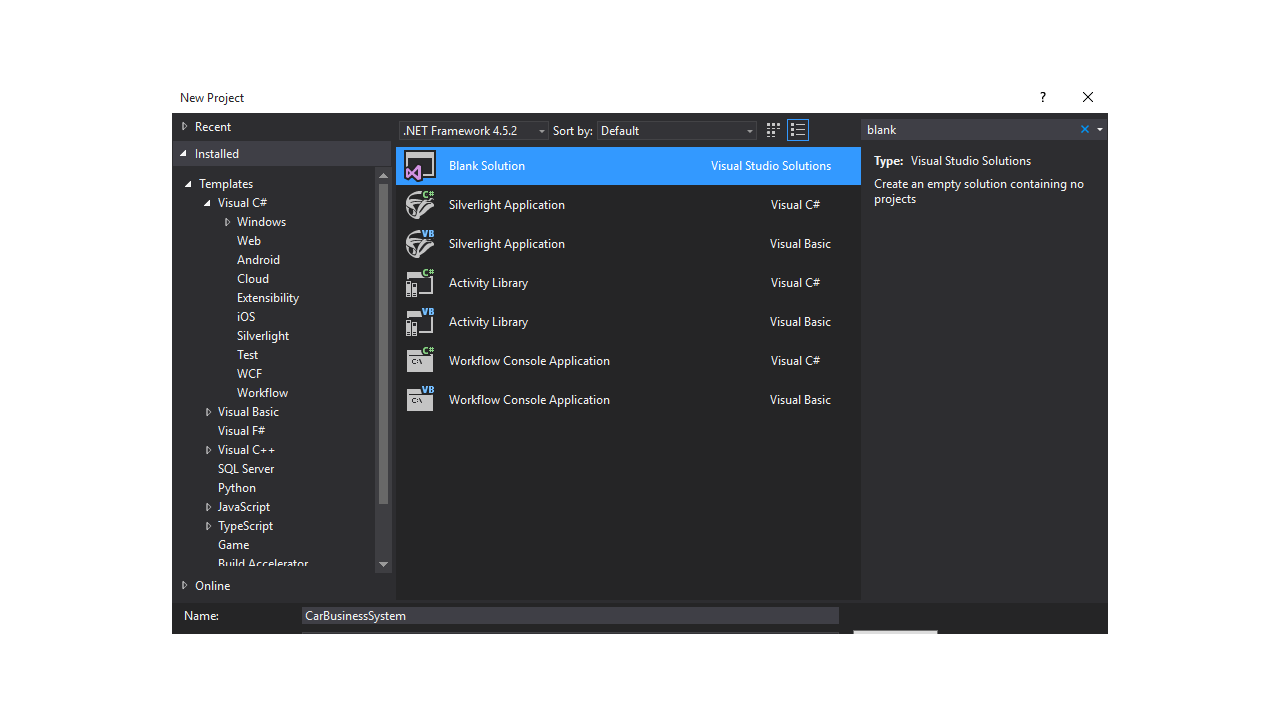
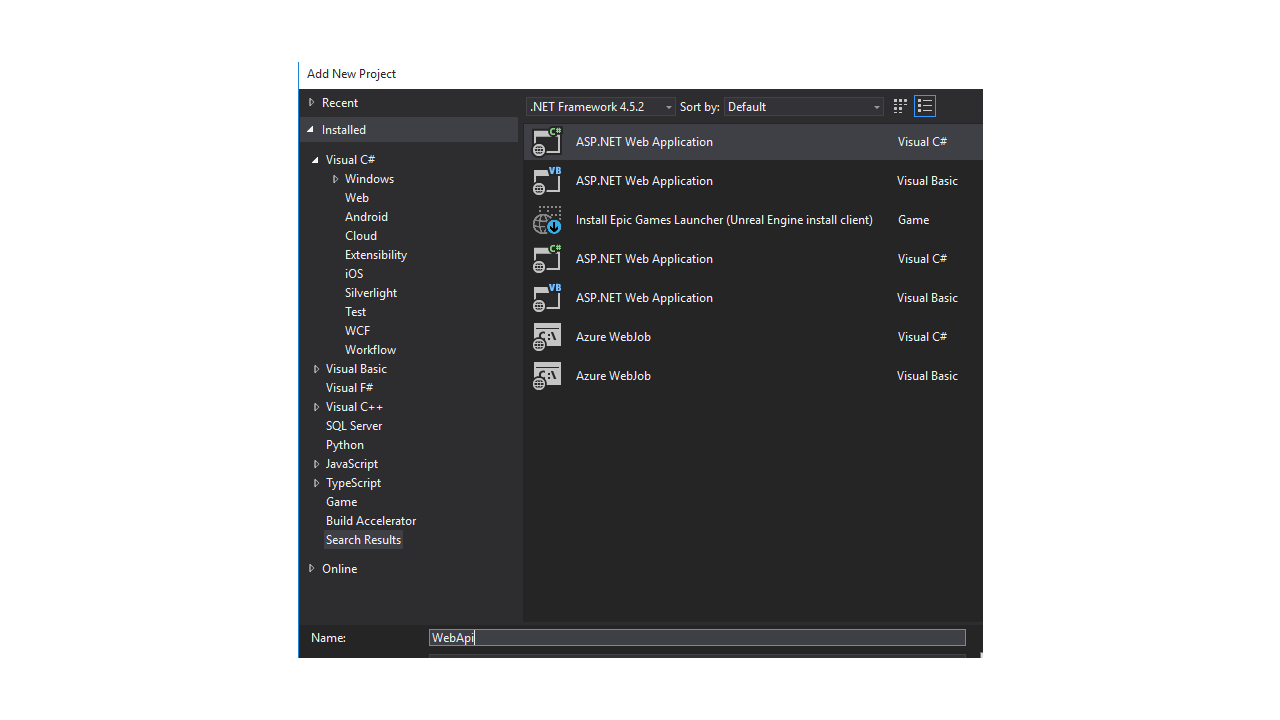
现在,有了空白数据库后,我们可以设置将使用信息的 ASP.NET Web API 项目。执行以下步骤:
- 在 Visual Studio 中创建一个新项目并选择“空白解决方案”。将其命名为 CarBusinessSystem。
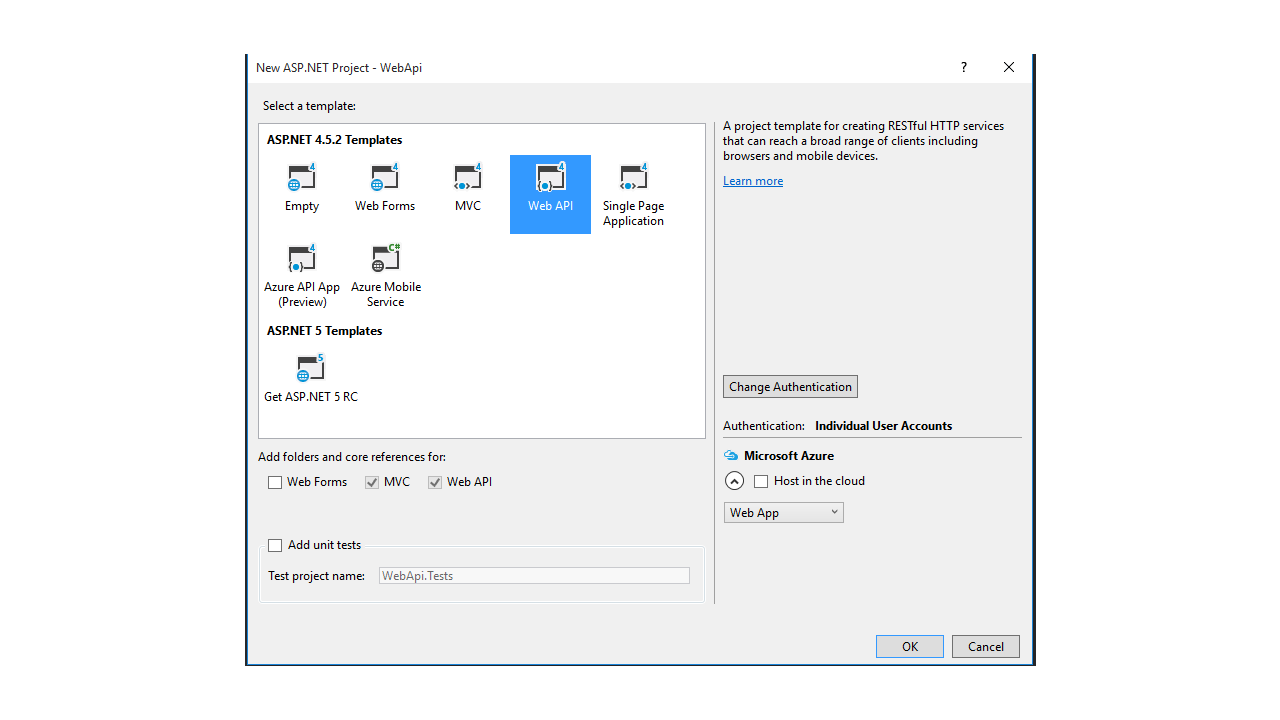
2 向此解决方案添加一个新的 Web API 项目。将其命名为 WebApi。这样,我们就可以使用模板来构建我们的用户帐户系统。
小心选择个人用户帐户作为身份验证选项。这样,我们的应用程序的功能将由项目模板支撑。
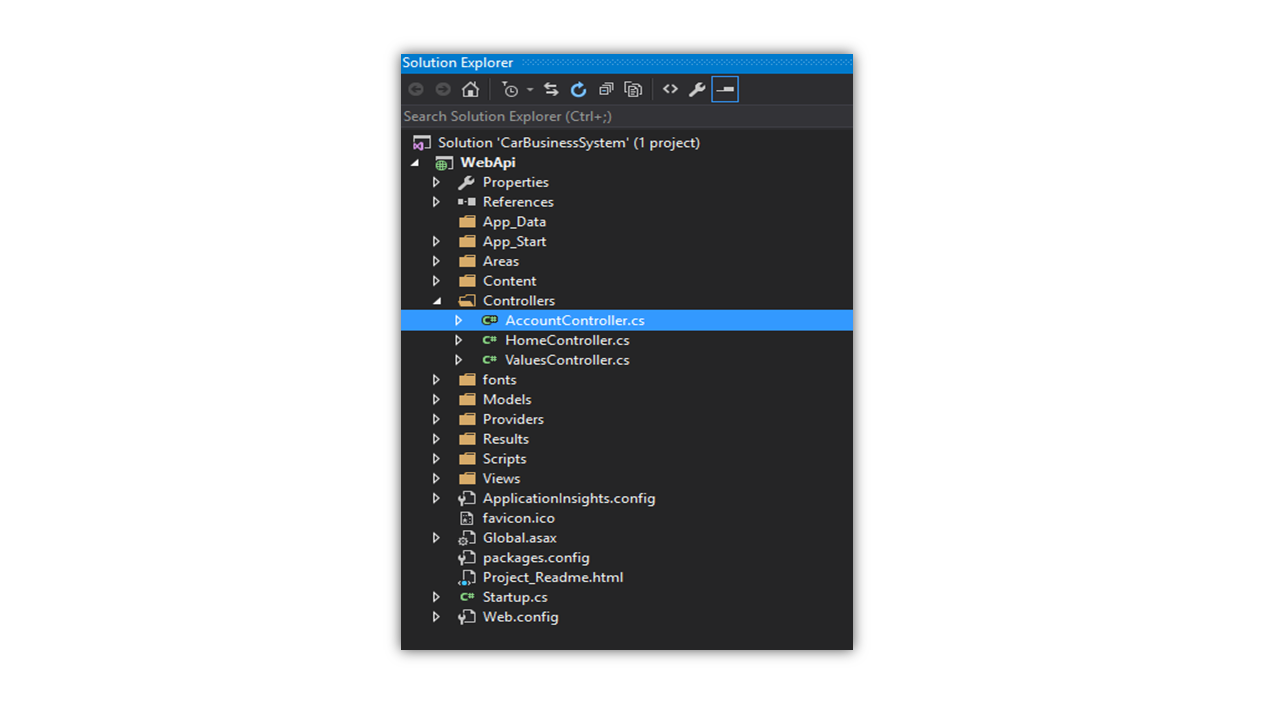
完成后,解决方案资源管理器中应出现以下设置:
为了撰写本文,我们将准备几个重要的文件。
• AppStart\IdentityConfig.cs
• AppStart\Startup.Auth.cs
•模型\IdentityModels.cs
•控制器\AccountController.cs
链接
现在,在创建了数据库和 asp 项目后,我们应该找到一种方法来链接它们。为了实现这一点,我们将基于指向数据库的连接字符串创建一个 DbContext。打开 Web.config 文件,看看<connectionStrings>标签之间发生了什么。目前,我们只有默认连接,它指向 LocalDb 的一个实例。我们还可以注意到 Models\IdentityModels.cs 中的默认 ApplicationDbContext 类基于此连接。我们的想法是创建一个新的上下文,然后基于它创建 ApplicationUserManager 。将默认字符串替换为以下字符串:
<add name="SystemUsers" connectionString="Data Source=.;Initial Catalog=CarBusinessDB;Integrated Security = True" providerName="System.Data.SqlClient" />
确定数据源时要小心。如果您使用的是SQL Server的本地实例,请坚持使用默认数据源,或者。。如果您使用的是Azure数据库或其他类型的服务,请在继续操作之前查看示例连接字符串。
下一步是创建我们自己的数据库上下文,我们可以使用它来存储我们的用户及其属性。在Models\IdentityModels.cs中,我们将删除 ApplicationDbContext 并在其位置粘贴以下代码。
      public class AppUsersDbContext : IdentityDbContext<ApplicationUser>
{
    public AppUsersDbContext()
        : base("SystemUsers", throwIfV1Schema: false)
    {
    }

    public static AppUsersDbContext Create()
    {
        return new AppUsersDbContext();
    }
}
如您所见,我们通过将其名称作为字符串传递,将Web.config文件中的新连接用于新上下文。
配置 ApplicationUserManager
一旦我们建立了数据库和ASP.NET项目之间的连接,我们就应该配置内置的 ApplicationUserManager,这样它就会使用这个上下文,而不是我们已经删除的默认上下文。
快速浏览一下UserStore和ApplicationUserManager类:
      namespace Microsoft.AspNet.Identity.EntityFramework
{
   //
   // Summary:
   //     EntityFramework based user store implementation that supports IUserStore, IUserLoginStore,
   //     IUserClaimStore and IUserRoleStore
   //
   // Type parameters:
   //   TUser:
   public class UserStore<TUser> : UserStore<TUser, IdentityRole, string, IdentityUserLogin, IdentityUserRole, IdentityUserClaim>, IUserStore<TUser>, IUserStore<TUser, string>, IDisposable where TUser : IdentityUser
   {
       //
       // Summary:
       //     Default constuctor which uses a new instance of a default EntityyDbContext
       public UserStore();
       //
       // Summary:
       //     Constructor
       //
       // Parameters:
       //   context:
       public UserStore(DbContext context);
   }
}
      namespace WebApi
{
   // Configure the application user manager used in this application. UserManager is defined in ASP.NET Identity and is used by the application.

   public class ApplicationUserManager : UserManager<ApplicationUser>
   {
       public ApplicationUserManager(IUserStore<ApplicationUser> store)
           : base(store)
       {
       }

       public static ApplicationUserManager Create(IdentityFactoryOptions<ApplicationUserManager> options, IOwinContext context)
       {
           ///Calling the non-default constructor of the UserStore class
           var manager = new ApplicationUserManager(new UserStore<ApplicationUser>(context.Get<ApplicationDbContext>()));

           /// Rest of the class ...
       }
   }
}
ApplicationUserManager 调用 UserStore 的构造函数,该构造函数接受 DbContext。然后它使用此连接来存储用户的数据。因此,当 ApplicationUserManager调用UserStore构造函数时,只需将我们的自定义上下文作为参数传递就足够了。
使用以下代码替换管理器变量:
var manager = new ApplicationUserManager(new UserStore<ApplicationUser>(context.Get<AppUsersDbContext>()));
下一步是在我们的应用程序每次启动时初始化我们的上下文,以便用户管理器和上下文使用相同的实例。
进入AppStart\Startup.Auth.cs文件,我们可以看到目前只有被删除的ApplicationDbContext被初始化了。
      public void ConfigureAuth(IAppBuilder app)
{
    // Configure the db context and user manager to use a single instance per request
    app.CreatePerOwinContext(ApplicationDbContext.Create);
    app.CreatePerOwinContext<ApplicationUserManager>(ApplicationUserManager.Create);

    // Enable the application to use a cookie to store information for the signed in user
    // and to use a cookie to temporarily store information about a user logging in with a third party login provider
    app.UseCookieAuthentication(new CookieAuthenticationOptions());
    app.UseExternalSignInCookie(DefaultAuthenticationTypes.ExternalCookie);

    /// Rest of the class ...
}
将app.CreatePerOwinContext(ApplicationDbContext.Create);行更改为以下代码:
app.CreatePerOwinContext(AppUsersDbContext.Create);
现在用户管理器和上下文使用相同的实例。
配置角色
设置 API 层的下一部分是在我们的应用程序中包含不同的角色。同样,我们将使用Identity包和我们创建的自定义 DB 上下文。用户由 ApplicationUserManager 管理,而角色由ApplicationRoleManager管理。
这次类及其引用没有由模板搭建,我们应该通过编写一些代码来包含它们。但在进行这一步之前,让我们在系统中注册第一个用户。
注册用户
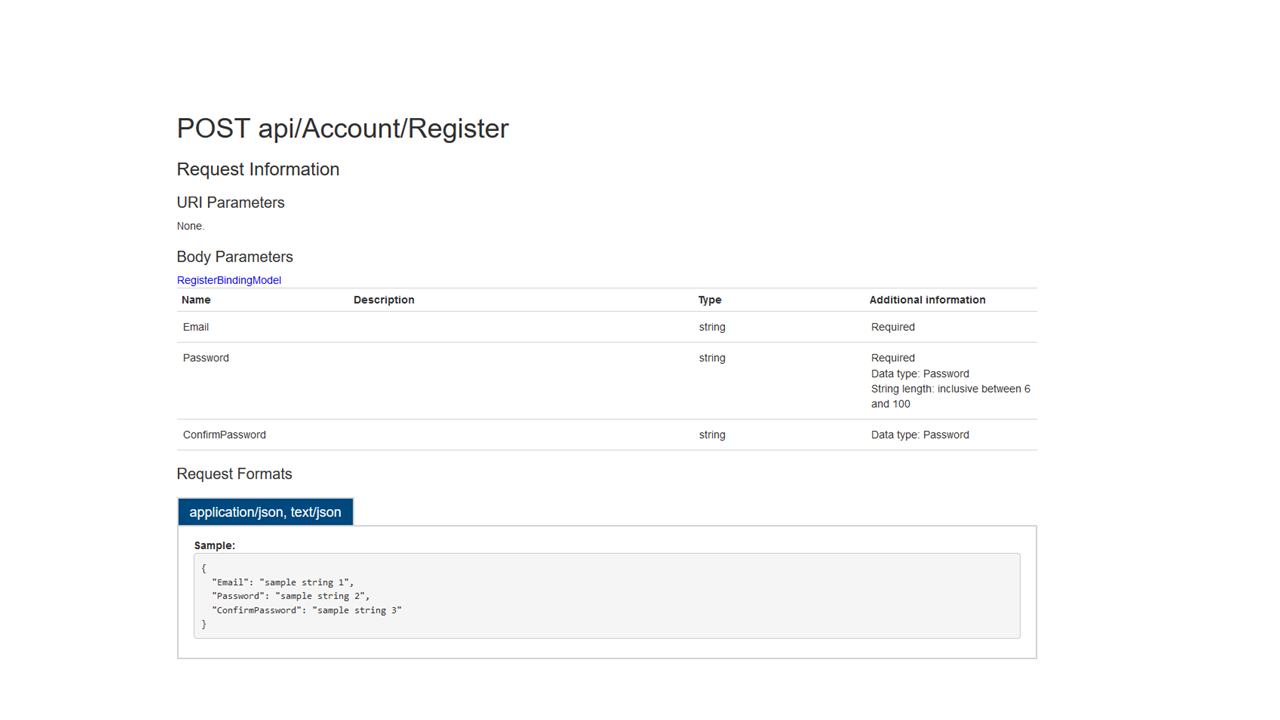
运行项目。在我们的 API 文档中,我们已经拥有了搭建好的Account Controller的所有端点
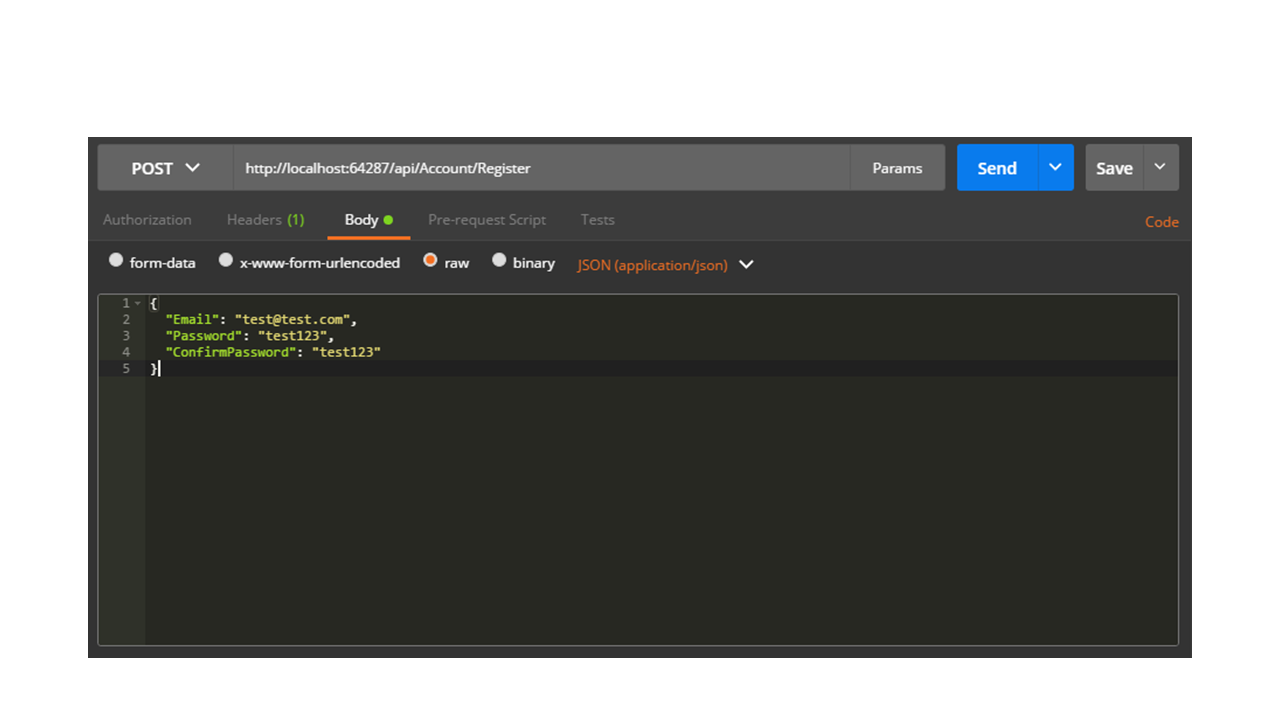
打开Postman或您用于发出请求的任何工具。
免责声明:本内容来源于第三方作者授权、网友推荐或互联网整理,旨在为广大用户提供学习与参考之用。所有文本和图片版权归原创网站或作者本人所有,其观点并不代表本站立场。如有任何版权侵犯或转载不当之情况,请与我们取得联系,我们将尽快进行相关处理与修改。感谢您的理解与支持!







请先 登录后发表评论 ~