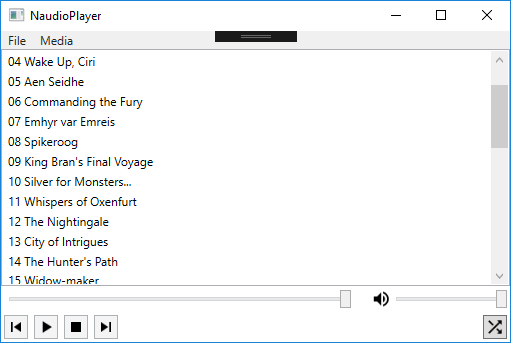
使用 NAudio 构建 WPF 媒体播放器
介绍
去年,我需要为电子听诊器构建一个Windows P resentation Foundation ( WPF) 应用程序,用于记录呼吸音频、将其保存为波形文件,并在用户请求后播放波形文件。当时,我对音频的唯一经验就是使用 Unity3D(它有一些很棒的音频处理工具)和 Matlab。我记得当时我心里想:“这有多难?我已经知道 C# 可以播放波形文件。核心库中一定有一些高级工具!”当然,我错了。
我不仅震惊地发现没有核心库,还惊讶于音频在编程中是一个非常深奥且具有挑战性的主题。幸运的是,Pluralsight 有关于音频和NAudio的精彩课程,所以我能够成功完成我的项目。
我认为,要想正确学习某些东西,您需要使用它创建一个基本项目。因此,在本教程中,我将解释如何使用非常流行的 .NET 音频库 NAudio 从头开始构建一个简单的媒体播放器。
为什么要构建自己的媒体播放器?
- 您可能有一个项目,需要制作应用内媒体播放器来实现您的目标,就像我的情况一样。
- 您可能需要其他媒体播放器未提供的非常特殊的功能。
- 在必须使用媒体播放器的安全环境中,您可能也不会信任第三方媒体播放器。
- 构建媒体播放器是一个编码项目,其结果是产生一个您可以日常使用并且感觉良好的工具。
无论出于什么原因,在音频编程方面您都会面临挑战。
与音频编程相关的挑战
第一个挑战来自于这样一个事实:音频不是传统对象,而是流对象。流通常是字节序列。如果要读取流,必须将其视为数组。但是,流不易操纵;您必须深入研究字节数组并弄清楚如何处理每个字节才能实现您想要的效果。此外,由于音频方面有许多考虑因素(或变量),例如声道数量、频率、文件格式等,调试音频程序可能会变得很麻烦。
此外,还有一些关键的内存管理问题。通常,当您处理完一个流后,您需要正确处理它。否则,它将留在内存中,导致内存泄漏。例如,如果您正在处理数百个音频流,但没有正确处理它们,您可能会很快耗尽内存,并且您的应用程序可能会崩溃。所以从本质上讲,您必须手动管理内存。
当你想到这个项目时,你可能会有很多疑问。“我们如何知道我们是否到达了音频文件的末尾?”,“我们如何停止或暂停流?”,“我们如何从上次中断的地方继续?”。当然,还有更多问题需要解决,但这些是我们需要应对的核心挑战。
考虑到这些挑战,播放音频文件这样的简单动作现在看起来相当复杂!
NAudio 来救援
幸运的是,有一个名为 NAudio 的 .NET 音频库可以为我们完成大部分工作。我们仍将使用流,并且必须面对随之而来的诸多挑战。然而,NAudio 消除了播放和录制音频文件的简单复杂性。NAudio 库的优点在于,它可以用于各种类型的项目。如果您只是想构建应用程序来播放或录制音频文件,那么无需深入研究流即可完成。如果您想要一些复杂的东西,例如用于操作音频或创建过滤器的平台,NAudio 也提供了非常好的工具。
获取 NAudio 有 3 种方法:
我通常使用 NuGet,因为它是最简单的,但如果你想了解它的实际工作原理,Codeplex 和 GitHub 页面上有很好的示例和文档。
我们的媒体播放器的功能
本教程的主要目的是构建一个简单的媒体播放器,它将能够:
- 播放各种格式的音频文件(wav、mp3、ogg、flac 等)
- 跳至开头、跳至结尾、播放/暂停、停止、随机播放按钮及其功能
- 有音量控制
- 有一个搜索栏
- 创建并操作播放列表
- 将文件添加到此播放列表
- 将文件夹添加到此播放列表
- 保存和加载播放列表
- 上一首歌曲播放结束后自动切换到播放列表中的下一首歌曲。
执行
在解决方案中,我们将有两个项目。一个用于实际应用,一个用于 NAudio 抽象。NAudio 非常擅长将我们从细节中抽象出来,但我想让我们能够非常轻松地使用几种方法完成所有操作,而不是调用 NAudio 代码来播放、暂停、停止等。
However there is a choice we have to make when it comes to the main project where the UI (User Interface) is: do we use the traditional event driven architecture or do we use Model View ViewModel architecture (MVVM). You might think that you would use MVVM because that's what all the cool kids use nowadays. However both architectures have advantages and disadvantages especially when it comes to developing a real-time application such as this.
I developed media players using both architectures on two different projects:
- If you use MVVM you write way less code. In this case, however, property binding has a nasty habit of breaking down and causing bugs if done incorrectly. This becomes problematic when it comes to implementing a real-time two-way bound seekbar control.
- If you use the good old event-driven architecture, you will undoubtedly write a lot more UI event code. But you will also have full control over what happens during those events, so it is easier to implement a real time control such as a seekbar.
In this tutorial, I will use the MVVM architecture. However since this is not an MVVM tutorial I won't go into details on how MVVM works. For more on MVVM, check out CodeProject's tutorial
Now that we've chosen our architecture, we need to generate the right namespaces in our project. Our solution structure will be like this:
- Solution
- Project: NaudioPlayer
- Models
- ViewModels
- Views
- Services
- Images
- Project: NaudioWrapper
- Project: NaudioPlayer
Creating the UI
I always like to start with the UI part when it comes to WPF projects because it provides me with a visual list of features that I need to implement.
Images, Namespaces, and Blend
Before we start on the UI, however, I will provide you the link for the images I used for the buttons so you will have them ready. For icons I used Google's free material design icons. You can get them from Google's material design page. After you download the icons, do a quick search of "play" or "pause" in the download directory to find the relevant icons.
We also need System.Windows.Interactivity and Microsoft.Expression.Interaction namespaces for our event bindings. I said we won't use event-driven architecture, but sometimes we cannot avoid events. In this case, namespaces provide events the MVVM way. Adding these namespaces can be tricky and might not always work as expected. These namespaces actually come with Blend, a UI development tool for XAML based projects. So if you have Blend installed (it comes with the Visual Studio installer), you can find those DLL (Dynamic Link-Library) files from:
- For .NET 4.5+ C:\Program Files (x86)\Microsoft SDKs\Expression\Blend\.NETFramework\v4.5\Libraries
- 对于 .NET 4.0 C:\Program Files (x86)\Microsoft SDKs\Expression\Blend\.NETFramework\v4.0\Libraries
如果您没有安装 Blend,只需运行 Visual Studio 安装程序并将其修改/添加到您的安装中。
但是,根据我的经验,在 Visual Studio 中添加这些功能并不总是有效。所以我通常会这样做:
- 在 Visual Studio 中创建 WPF 项目
- 将xmlns:i="https://schemas.microsoft.com/expression/2010/interactivity"添加到窗口。
- 关闭 Visual Studio 并在 Blend 中打开项目。
- 从菜单中单击项目->添加引用,然后从该菜单添加引用。
- 关闭 Blend 并在 Visual Studio 中重新打开项目
现在我们的 UI 代码已经准备就绪。
UI 代码
以下是我们用于 UI 的可扩展应用程序标记语言( XAML) 代码:
      <Window x:Class="NaudioPlayer.MainWindow"
        xmlns="http://schemas.microsoft.com/winfx/2006/xaml/presentation"
        xmlns:x="http://schemas.microsoft.com/winfx/2006/xaml"
        xmlns:d="http://schemas.microsoft.com/expression/blend/2008"
        xmlns:mc="http://schemas.openxmlformats.org/markup-compatibility/2006"
        xmlns:local="clr-namespace:NaudioPlayer"
        xmlns:i="http://schemas.microsoft.com/expression/2010/interactivity"
        xmlns:viewModels="clr-namespace:NaudioPlayer.ViewModels"
        mc:Ignorable="d"
        Title="{Binding Title}" Height="350" Width="525">
    <Window.DataContext>
        <viewModels:MainWindowViewModel/>
    </Window.DataContext>
    <DockPanel LastChildFill="True">
        <Menu DockPanel.Dock="Top">
            <MenuItem Header="File">
                <MenuItem Header="Save Playlist" Command="{Binding SavePlaylistCommand}"/>
                <MenuItem Header="Load Playlist" Command="{Binding LoadPlaylistCommand}"/>
                <MenuItem Header="Exit" Command="{Binding ExitApplicationCommand}"/>
            </MenuItem>
            <MenuItem Header="Media">
                <MenuItem Header="Add File to Playlist..." Command="{Binding AddFileToPlaylistCommand}"/>
                <MenuItem Header="Add Folder to Playlist..." Command="{Binding AddFolderToPlaylistCommand}"/>
            </MenuItem>
        </Menu>
        <Grid DockPanel.Dock="Bottom" Height="30">
            <Grid.ColumnDefinitions>
                <ColumnDefinition Width="30"/>
                <ColumnDefinition Width="30"/>
                <ColumnDefinition Width="30"/>
                <ColumnDefinition Width="30"/>
                <ColumnDefinition Width="*"/>
                <ColumnDefinition Width="30"/>
            </Grid.ColumnDefinitions>
            <Button Grid.Column="0" Margin="3" Command="{Binding RewindToStartCommand}">
                <Image Source="../Images/skip_previous.png" VerticalAlignment="Center" HorizontalAlignment="Center"/>
            </Button>
            <Button Grid.Column="1" Margin="3" Command="{Binding StartPlaybackCommand}">
                <Image Source="{Binding PlayPauseImageSource}" VerticalAlignment="Center" HorizontalAlignment="Center"/>
            </Button>
            <Button Grid.Column="2" Margin="3" Command="{Binding StopPlaybackCommand}">
                <Image Source="../Images/stop.png" VerticalAlignment="Center" HorizontalAlignment="Center"/>
            </Button>
            <Button Grid.Column="3" Margin="3" Command="{Binding ForwardToEndCommand}">
                <Image Source="../Images/skip_next.png" VerticalAlignment="Center" HorizontalAlignment="Center"/>
            </Button>
            <Button Grid.Column="5" Margin="3" Command="{Binding ShuffleCommand}">
                <Image Source="../Images/shuffle.png" VerticalAlignment="Center" HorizontalAlignment="Center"/>
            </Button>
        </Grid>
        <Grid DockPanel.Dock="Bottom" Margin="3">
            <Grid.ColumnDefinitions>
                <ColumnDefinition Width="3*"/>
                <ColumnDefinition Width="20"/>
                <ColumnDefinition Width="20"/>
                <ColumnDefinition Width="*"/>
            </Grid.ColumnDefinitions>
            <Slider Grid.Column="0" Minimum="0" Maximum="{Binding CurrentTrackLenght, Mode=OneWay}" Value="{Binding CurrentTrackPosition, Mode=TwoWay}" x:Name="SeekbarControl" VerticalAlignment="Center">
                <i:Interaction.Triggers>
                    <i:EventTrigger EventName="PreviewMouseDown">
                        <i:InvokeCommandAction Command="{Binding TrackControlMouseDownCommand}"></i:InvokeCommandAction>
                    </i:EventTrigger>
                    <i:EventTrigger EventName="PreviewMouseUp">
                        <i:InvokeCommandAction Command="{Binding TrackControlMouseUpCommand}"></i:InvokeCommandAction>
                    </i:EventTrigger>
                </i:Interaction.Triggers>
            </Slider>
            <Image Grid.Column="2" Source="../Images/volume.png"></Image>
            <Slider Grid.Column="3" Minimum="0" Maximum="1" Value="{Binding CurrentVolume, Mode=TwoWay}" x:Name="VolumeControl" VerticalAlignment="Center">
                <i:Interaction.Triggers>
                    <i:EventTrigger EventName="ValueChanged">
                        <i:InvokeCommandAction Command="{Binding VolumeControlValueChangedCommand}"></i:InvokeCommandAction>
                    </i:EventTrigger>
                </i:Interaction.Triggers>
            </Slider>
        </Grid>
        <Grid DockPanel.Dock="Bottom">
            <Grid.ColumnDefinitions>
                <ColumnDefinition Width="70"/>
                <ColumnDefinition Width="Auto"/>
            </Grid.ColumnDefinitions>
            <TextBlock Grid.Column="0" Text="Now playing: "></TextBlock>
            <TextBlock Grid.Column="1" Text="{Binding CurrentlyPlayingTrack.FriendlyName, Mode=OneWay}"/>
        </Grid>
        <ListView x:Name="Playlist" ItemsSource="{Binding Playlist}" SelectedItem="{Binding CurrentlySelectedTrack, Mode=TwoWay}">
            <ListView.ItemTemplate>
                <DataTemplate>
                    <Grid>
                        <Grid.ColumnDefinitions>
                            <ColumnDefinition></ColumnDefinition>
                        </Grid.ColumnDefinitions>
                        <TextBlock Grid.Column="0" Text="{Binding Path=FriendlyName, Mode=OneWay}"></TextBlock>
                    </Grid>
                </DataTemplate>
            </ListView.ItemTemplate>
        </ListView>
    </DockPanel>
</Window>
基于 UI 的命令
因此,通过查看我们的 XAML 代码,在我们的MainWindowViewModel视图模型中,我们需要实现以下命令:
- 菜单命令
- SavePlaylistCommand:此命令将把我们的播放列表保存到文本文件中,只需将播放列表中每个曲目的路径写为<filename>.playlist即可。
- LoadPlaylistCommand:此命令将读取我们选择的.playlist文件并为我们生成播放列表。
- ExitApplicationCommand:此命令将处理所有音频流并关闭应用程序。
- AddFileToPlaylistCommand:此命令将单个音频文件添加到我们的播放列表中。
- AddFolderToPlaylistCommand:此命令将把一个文件夹添加到我们的播放列表中。
- 玩家命令
- RewindToStartCommand:此命令将<font style="verti
免责声明:本内容来源于第三方作者授权、网友推荐或互联网整理,旨在为广大用户提供学习与参考之用。所有文本和图片版权归原创网站或作者本人所有,其观点并不代表本站立场。如有任何版权侵犯或转载不当之情况,请与我们取得联系,我们将尽快进行相关处理与修改。感谢您的理解与支持!


请先 登录后发表评论 ~