使用自动编码器对图像进行去噪
介绍
相册中的一些照片会让你想,“这张奶奶的照片大约有 50 年的历史了。如果这张可爱的照片更清晰、更丰富多彩就好了。” 数码摄影技术的进步令人瞩目。它可以给黑白照片和视频赋予色彩,并恢复任何扭曲的图像,这些图像可以作为法医的有用证据。计算机视觉和深度学习技术只是锦上添花。神经网络和卷积神经网络以其数据建模技术和方法而闻名。
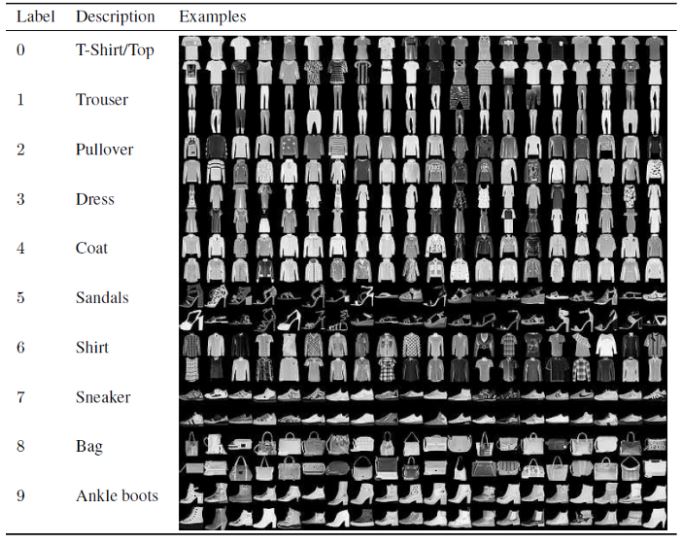
本指南将介绍自动编码器如何帮助减少图像中的噪声。它将使用 Keras 模块和 Fashion MNIST 数据。您可以在此处下载。在本指南结束时,您将了解自动编码器如何重建噪声图像。
什么是自动编码器?
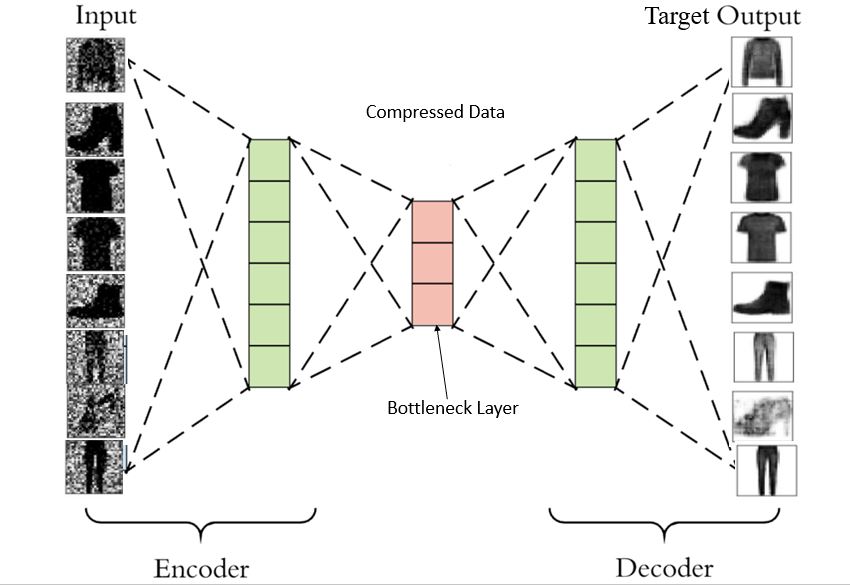
自动编码器属于自监督学习。有人说它是无监督的,因为它们在分类时独立于标记的响应。神经网络使用它们进行表示学习。在下图中,自动编码器包含一个瓶颈网络,该网络对输入执行压缩知识表示。要利用自动编码器的性能,您需要确保它们仔细地重新创建观察结果,并在训练数据上学习通用编码和解码方法。在自动编码器中,中间层/隐藏核心层比输出层更有价值。
如果中间层的神经元数量少于输入层的神经元数量,则网络会提取更有效的信息。中间层别无选择,只能学习最重要的图像模式,而忽略噪声。如果中间层的神经元更多,则神经网络将具有更高的学习模式的能力,从而使网络变得懒惰。它会将输入值复制并粘贴到输出值中,学习噪声,而不会提取任何特征。
因此,瓶颈模型至关重要。
指南《神经机器翻译和NMT 的编码器和解码器:使用 Keras 的编码器和解码器》讨论了编码器和解码器模型如何协同工作以生成用于机器翻译的巨型模型。在这里,在图像去噪中,编码网络将压缩输入层值(瓶颈)。其结果将作为中间层的输入。解码器网络的工作是重建信息并提供结果。大多数计算机视觉工程师在隐藏层数量方面遵循对称/镜像排列,这意味着编码器网络中的隐藏层和神经元数量与解码器网络中的隐藏层和神经元数量相同。
为什么要使用自动编码器?
要去除图像中的噪声,降低其维数很重要。主成分分析 (PCA) 用于执行此任务。但 PCA 有局限性;它只应用线性变换,还包含异常值。另一方面,自动编码器可以借助其非线性激活函数和多层堆叠将非线性引入网络。使用这种神经网络可以轻松检测到降维的副产品异常值。
导入库并加载数据集
本指南中的示例将参考Keras在 Fashion MNIST 图像建模上的实现。本指南在 Google Colab GPU 上运行。我强烈建议使用 GPU,因为它可以大大缩短训练时间。转到编辑 > 笔记本设置,进行更改,然后保存。
如果您正在使用其他 IDE 或了解 Google Colab 如何处理数据,请跳过此部分。
如果您将数据加载到 Colab 中的普通文件夹中,它将暂时存在。开始之前,请在 Colab 中安装您的驱动器。
      from google.colab import drive
drive.mount('/content/drive')
复制并粘贴验证码,然后按回车键。
一切就绪!导入重要的库和模块。
      import seaborn as sns
import numpy as np
import pandas as pd

from sklearn.model_selection import train_test_split

import matplotlib.pyplot as plt
from tensorflow.keras.models import Sequential, Model
from tensorflow.keras.layers import Dense, Input
from tensorflow.keras.utils import to_categorical
%matplotlib inline
sns.set(style = 'white', context = 'notebook', palette = 'deep')
np.random.seed(42)
要读取 CSV 数据,您需要pandas.read_csv。它会将数据读入 Pandas 数据框。或者,您可以使用库中的keras.dataset并导入fashion_mnist。使用fashion.mnist.load_data()来使用数据集。
      train = pd.read_csv("/content/drive/My Drive/fashion-mnist_test.csv")
test = pd.read_csv("/content/drive/My Drive/fashion-mnist_train.csv")
检查像素在数据框中的样子。train.head ()将显示数据框的前五列。
train.head()
因此,28x28 大小的数据中总共有 784 个像素。黑白图像采用 2D 数组形式。
准备图像数据
数据包含黑白图像,其中无符号整数范围为 0 到 255。
这里需要缩放图像。通过将像素值重新缩放到 0-1 范围来规范化像素值。第一步是将数据类型从数据框和系列转换为 NumPy ndarray。
      y_train = train["label"]
x_train = train.drop(labels = ["label"], axis = 1)

print(type(x_train))
print(type(y_train))
      x_train = x_train.to_numpy()
y_train = y_train.to_numpy()

print(type(x_train))
print(type(y_train))
x_train = x_train.astype('float')/255.
Now by using the holdout method, split the training and testing data into an 80:20 ratio.
x_train, x_val, y_train, y_val = train_test_split(x_train, y_train, test_size = 0.2, random_state = 42)
Check the number of samples you got.
      x_train_size = len(x_train)
x_val_size = len(x_val)

print(x_train_size)
print(x_val_size)
Adding Noise: Denoising Autoencoder
To develop a generalized model, a bit of noise is added to the input data to make it corrupt. The uncorrupted data is maintained, and it acts as the output. Here the model cannot memorize the training data and maps out the result as input. Output targets are different. This forces the model to map the input data to a lower-dimension manifold (a concentration point for input data). Consider an example where the data is comprised of car images; all images that look like cars would be part of a manifold. If this manifold is accurately detected then the added noise can be skipped. You can refer to this paper to gain more knowledge.
Add synthetic noise by applying random data on the image data. You will need to normalize that new form of random image too. To achieve that, multiply the random noise by 0.9 and clip the range between 0 to 1. You may also use the Gaussian noise matrix and notice the difference.
      #method-1
x_train_noisy = x_train + np.random.rand(x_train_size, 784) * 0.9
x_val_noisy = x_val + np.random.rand(x_val_size, 784) * 0.9

#method-2: Adding Gaussian Noise
# x_train_noisy = x_train + 0.75 * np.random.normal(loc=0.0, scale=1.0, size=x_train.shape)
# x_val_noisy = x_val + 0.75 * np.random.normal(loc=0.0, scale=1.0, size=x_val.shape)

x_train_noisy = np.clip(x_train_noisy, 0., 1.)
x_val_noisy = np.clip(x_val_noisy, 0., 1.)
Only for the visualization purpose, the image is reshaped from 1D array to 2D array, 784 to (28,28).
      def plot(x, p , labels = False):
 plt.figure(figsize = (20,2))
 for i in range(10):
 plt.subplot(1, 10, i+1)
 plt.imshow(x[i].reshape(28,28), cmap = 'binary')
 plt.xticks([])
 plt.yticks([])
 if labels:
 plt.xlabel(np.argmax(p[i]))
 plt.show()
 return
plot(x_train, None)
plot(x_train_noisy,None)
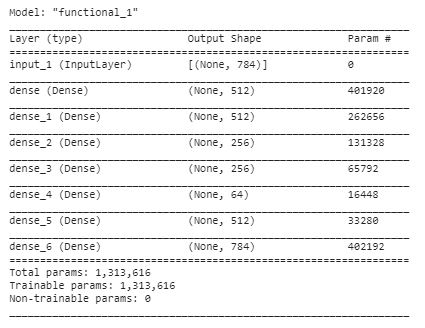
The input size is of a 1D array. Notice that Dense layer 64 produces the bottleneck. The final layer at the decoder end gives the output of 784 units. The sigmoid function gives out the value between 0 and 1. This layer decides whether to consider the noise pixel or not.
      input_image = Input(shape = (784, ) )

encoded = Dense(512, activation = 'relu')(input_image)
encoded = Dense(512, activation = 'relu')(encoded)
encoded = Dense(256, activation = 'relu')(encoded)
encoded = Dense(256, activation = 'relu')(encoded)
encoded = Dense(64, activation = 'relu')(encoded)

decoded = Dense(512, activation = 'relu')(encoded)
decoded = Dense(784, activation = 'sigmoid')(decoded)

autoencoder = Model(input_image, decoded)
autoencoder.compile(loss= 'binary_crossentropy' , optimizer = 'adam')
autoencoder.summary()
The input size is of the 1D array. Notice that the Dense layer 64 produces the bottleneck. The last layer at the decoder end gives the output of 784 units. The sigmoid function gives out the value between 0 and 1. This layer decides if to consider the noise pixel.
      import tensorflow as tf
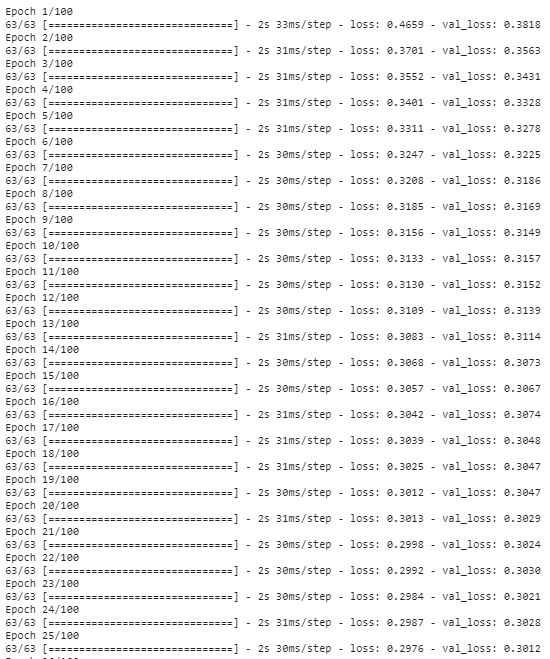
history = autoencoder.fit(x_train_noisy, x_train, epochs=100, batch_size=128,
 shuffle = True, validation_data=(x_val_noisy, x_val))
Producing a Denoised Image
Below you can see how well denoised images were produced from noisy ones present in x_val. There are three outputs: original test image, noisy test image, and denoised test image form autoencoders.
preds = autoencoder.predict(x_val_noisy)
      print("Test Image")
plot(x_val, None)
      print("Noisy Image")
plot(x_val_noisy, None)
      print("Denoised Image")
plot(preds, None)
免责声明:本内容来源于第三方作者授权、网友推荐或互联网整理,旨在为广大用户提供学习与参考之用。所有文本和图片版权归原创网站或作者本人所有,其观点并不代表本站立场。如有任何版权侵犯或转载不当之情况,请与我们取得联系,我们将尽快进行相关处理与修改。感谢您的理解与支持!

























请先 登录后发表评论 ~