
如何使用 Terraform 和 AWS 部署应用程序?
欢迎阅读本教程,重点介绍如何使用Terraform在Amazon EC2上部署Flask 应用程序!在深入了解具体细节之前,让我们先介绍一些您需要了解的基本概念。
重要概念
亚马逊网络服务(AWS)
AWS 是一个综合云平台,提供计算能力、存储等服务。在 AWS 中,弹性计算云 (EC2) 对我们来说特别重要,因为它提供可扩展的虚拟服务器
EC2 和负载平衡
EC2 实例是 AWS 环境中的虚拟服务器。这些实例之间的负载平衡有助于分配传入的应用程序流量,确保可靠性和效率。
Terraform 在现代云部署中的作用
Terraform 是 HashiCorp 的一款开源工具,也是基础设施即代码 (IaC)领域的重要参与者。与传统的手动基础设施管理不同,Terraform 允许您使用简单的声明性代码定义和配置云基础设施。这种方法带来了许多好处:
- 一致性和可重复性: Terraform 确保基础设施部署在不同环境中一致且可重复,从而减少错误和差异。
- 版本控制:基础设施即代码意味着您的云设置可以进行版本控制,类似于您管理源代码的方式。
- 自动化和效率: Terraform 自动化了基础设施配置过程,大大减少了管理云资源所需的时间和精力。
- 可扩展性:使用 Terraform,扩大或缩小基础设施的规模变得更加简单,因为可以在代码中进行更改并重新应用。
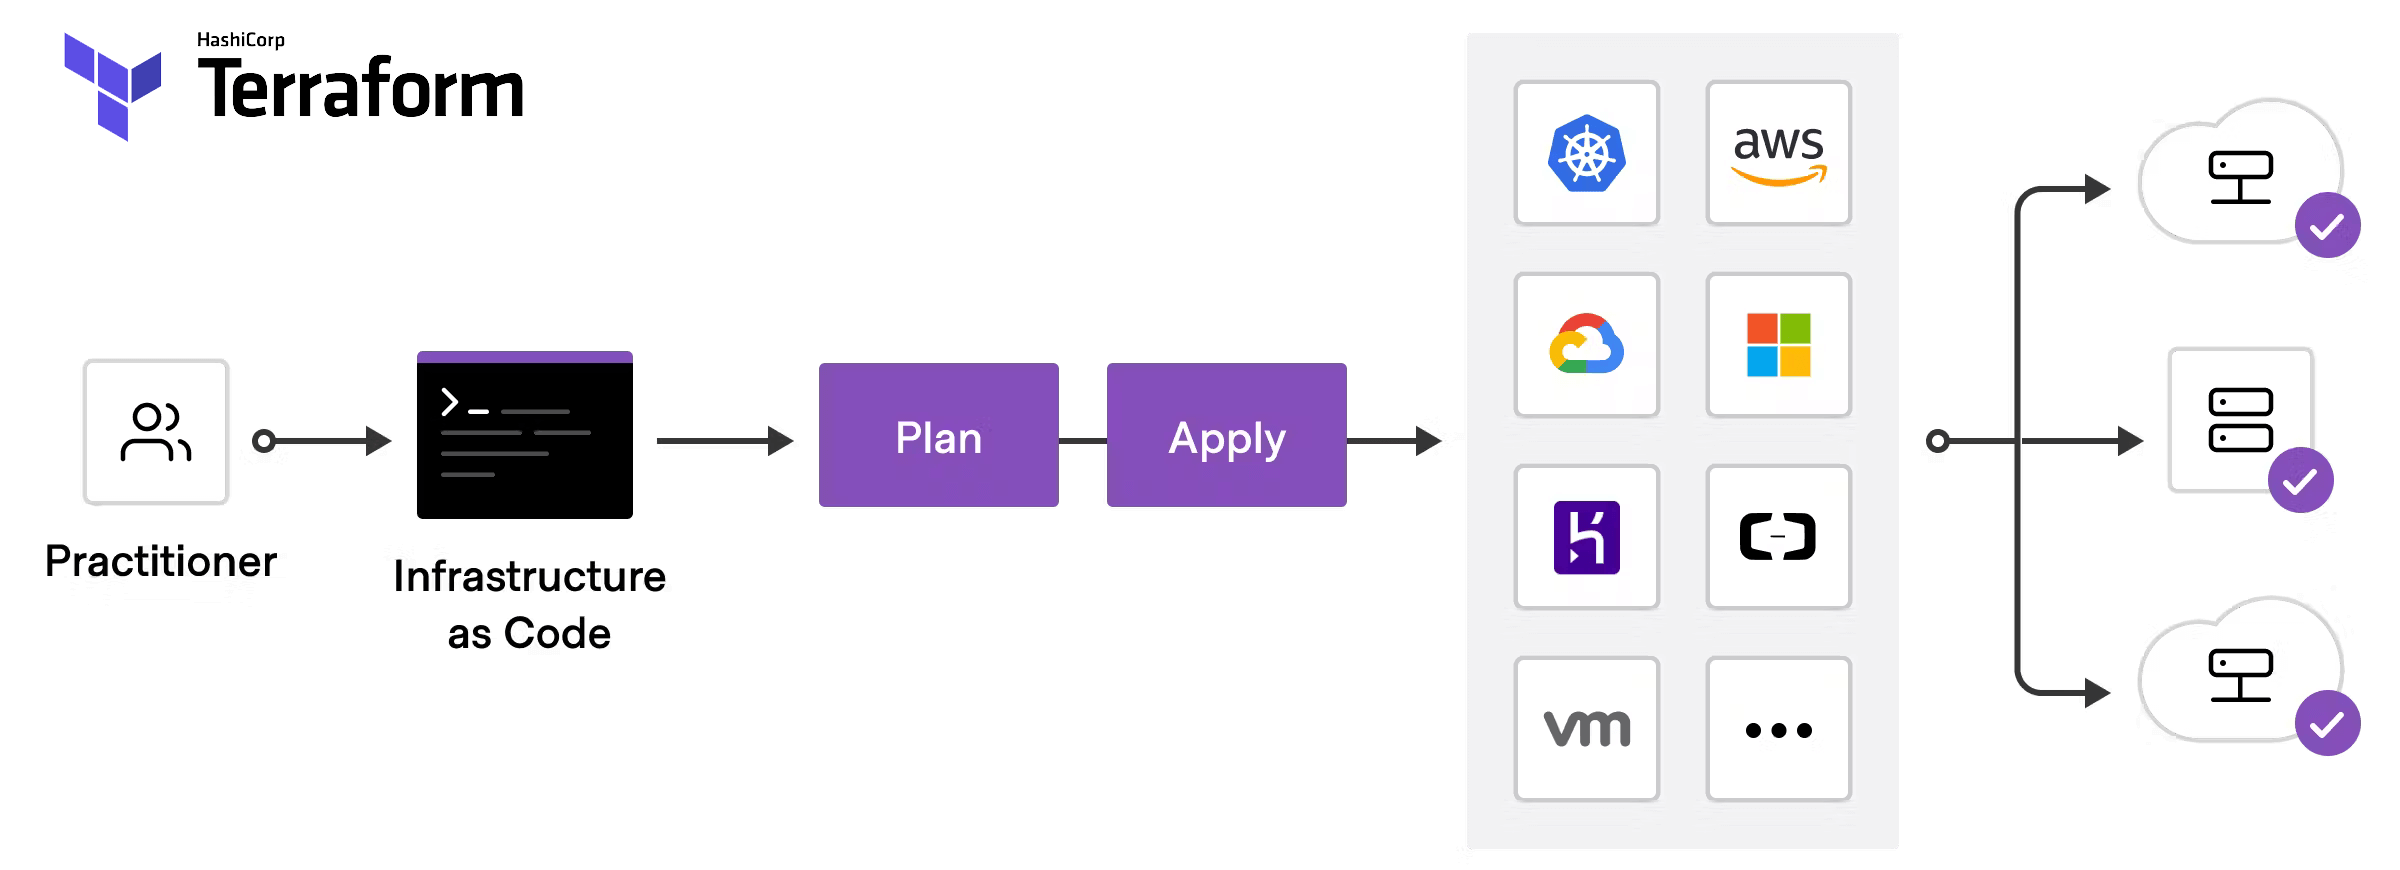
了解 Terraform 和 AWS 模块
Terraform 模块是构建可重复使用、可维护且可扩展的基础架构的基石。可以将 Terraform 模块视为多个资源的容器,这些资源可以一起使用。模块可以包含虚拟网络、计算实例等资源,也可以包含更高级别的组件(例如整个 Web 应用)。
模块允许您将一组资源和配置封装在一个方便的包中。它们可以在不同的项目中重复使用或与社区共享。这不仅可以加快开发过程,还可以确保您的基础架构的一致性。
AWS 官方模块概览
VPC (Virtual Private Cloud): This module sets up a network environment in AWS. It's a fundamental building block for your cloud infrastructure, isolating your resources in a virtual network, tailored to your requirements.
Security Group: Acts as a virtual firewall for your EC2 instances to control inbound and outbound traffic. Security groups are crucial for ensuring the secure access to your instances.
ALB (Application Load Balancer): This module helps in distributing incoming application traffic across multiple targets, such as EC2 instances, in multiple Availability Zones. This increases the availability of your application.
EC2 Instance: This module allows the provisioning of EC2 instances (virtual servers in AWS). It is highly configurable, letting you specify the size, type, and other key parameters of the instances based on your application needs.
By combining these modules, you can build a robust and scalable cloud infrastructure. Our journey begins with setting up these foundational elements using Terraform, preparing us for deploying Flask applications.
Setting Up the AWS Environment with Terraform
In this section, we'll walk through the process of setting up a basic AWS environment using Terraform. This includes creating a Virtual Private Cloud (VPC) and setting up Security Groups for EC2 instances and the Application Load Balancer (ALB). For organization, we'll use different files for each part of our setup.
This is the main Terraform configuration file where we define our provider and the required version.
main.tf
      provider "aws" {
  region = "us-west-2"  # Change to your preferred AWS region
}

terraform {
  required_providers {
    aws = {
      source  = "hashicorp/aws"
      version = "~> 5.0"
    }
  }
}
vpc.tf
Here, we'll create a VPC using the terraform-aws-modules/vpc/aws module. This module sets up a VPC with all the necessary configurations.
      module "vpc" {
  source  = "terraform-aws-modules/vpc/aws"
  version = "5.5.1" # Check for the latest version

  name = "MyVPC"
  cidr = "10.0.0.0/16"

  azs             = ["us-west-2a", "us-west-2b", "us-west-2c"]
  public_subnets  = ["10.0.101.0/24", "10.0.102.0/24", "10.0.103.0/24"]
  enable_nat_gateway      = false
  enable_vpn_gateway      = false
  map_public_ip_on_launch = true
  enable_dns_hostnames    = true

  tags = {
    "Environment" = "Development"
  }
}
It is important to remark here we could use Terraform functions, variables and locals to make this configuration more dynamic; but we stated it this way for brevity.
security_groups.tf
Next, we'll set up Security Groups using the terraform-aws-modules/security-group/aws module. We'll create one for EC2 instances and another for the ALB.
      module "ec2_security_group" {
  source  = "terraform-aws-modules/security-group/aws"
  version = "5.5.1" # Check for the latest version

  name        = "ec2-security-group"
  description = "Security group for EC2 instances"
  vpc_id      = module.vpc.vpc_id

  ingress_cidr_blocks = ["10.0.0.0/16"] # Adjust as necessary
  ingress_rules       = ["all-all"]
  egress_rules        = ["all-all"]
}

module "alb_security_group" {
  source  = "terraform-aws-modules/security-group/aws"
  version = "5.5.1" # Check for the latest version

  name        = "alb-security-group"
  description = "Security group for ALB"
  vpc_id      = module.vpc.vpc_id

  ingress_cidr_blocks = ["0.0.0.0/0"]   # Adjust as necessary for your use case
     ingress_rules = ["http-80-tcp", "https-443-tcp"]
     egress_rules = ["all-all"]
}
In `security_groups.tf`, we've defined two modules: `ec2_security_group` for our EC2 instances and `alb_security_group` for the ALB. The `ec2_security_group` allows all traffic from the VPC, but you should adjust this to suit your security needs. The `alb_security_group` is set up to allow HTTP and HTTPS traffic.
This setup creates a basic AWS environment with a VPC and necessary security groups. In the next section, we'll delve into deploying Flask applications within this environment. Remember, it's crucial to review and understand the security implications of the configurations you apply, especially when opening ports or allowing traffic.
Setting Up the Application Load Balancer
应用程序负载均衡器 (ALB) 是一项 AWS 服务,旨在将传入的应用程序流量分配到多个可用区中的多个目标(例如 EC2 实例)。这可以提高应用程序的可用性和可扩展性。ALB 的关键组件包括:
目标组: ALB 将请求路由到的一组目标(例如 EC2 实例)。
目标组附加:指将 EC2 实例或其他资源附加到目标组的过程。
转发规则:定义如何根据 URL 路径或主机名等标准将请求路由到目标组的规则。
域:在 AWS 中,将 ALB 与 Route 53 集成涉及将域名指向 ALB,以使您的应用程序可通过人类可读的 URL 访问。

alb.tf
该文件将包含使用 terraform-aws-modules/alb/aws 模块的 ALB 配置。
      module "alb" {
  source  = "terraform-aws-modules/alb/aws"
  version = "9.4.1"  # Ensure to check for the latest version

  name = "my-alb"

  load_balancer_type = "application"
  vpc_id             = module.vpc.vpc_id
  subnets            = module.vpc.public_subnets
  security_groups    = module.alb_security_group.security_group_id


  target_groups = {
    default = {
      name_prefix      = "default-"
      backend_protocol = "HTTP"
      backend_port     = 80
      target_type      = "instance"
      health_check = {
        enabled             = true
        interval            = 30
        path                = "/"
        port                = 5000
        healthy_threshold   = 3
        unhealthy_threshold = 3
        timeout             = 5
        matcher             = "200"
      }
    }
  }

  http_tcp_listeners = [{
    port     = 80
    protocol = "HTTP"
    default_action = {
      type             = "forward"
      target_group_name = "default"
    }
  }]

  tags = {
    Environment = "Development"
  }
}

resource "aws_lb_target_group_attachment" "example" {
  count = var.instance_count
  target_group_arn = module.alb.target_groups["default"].arn
  target_id        = module.aws_instance[count.index].id
}
设置 EC2 实例
对于 Web 应用程序,EC2 实例可提供必要的计算能力。根据应用程序的要求,您可以选择不同的实例类型,这些实例类型可提供各种 CPU、内存、存储和网络容量的组合。
要部署将运行 Python Flask 应用程序的 EC2 实例,我们将使用terraform-aws-modules/ec2-instance模块。此模块简化了启动和管理 EC2 实例的过程。
ec2_实例.tf
此 Terraform 配置将创建两个适合运行 Flask 应用程序的 EC2 实例。
      module "ec2_instances" {
  source  = "terraform-aws-modules/ec2-instance/aws"
  version = "5.6.0"  # Check for the latest version

  name           = "flask-app-instance"
  instance_count = 2

  ami                    = "ami-12345678"  # Replace with the correct AMI for your region and OS
  instance_type          = "t2.micro"      # Adjust the instance type based on your needs
  subnet_id              = module.vpc.public_subnets[0]
  vpc_security_group_ids = [module.ec2_security_group.security_group_id]

  tags = {
    "Name"        = "FlaskAppInstance"
    "Environment" = "Development"
  }
}
在此配置中,将ami-12345678替换为适合您区域和所需操作系统的 AMI ID。实例配置为我们 VPC 中第一个子网的一部分,并使用与我们的 ALB 默认目标组关联的安全组。我们可以通过使用 Terraform 函数更好地进行分发。
要配置 EC2 实例以运行 Flask 应用程序,您通常会使用配置工具或用户数据脚本。为简单起见,以下是安装 Python 和 Flask 的用户数据示例:
用户数据
      #!/bin/bash
sudo apt update
sudo apt install python3 python3-pip -y
pip3 install Flask
# Flask application setup here (e.g., cloning a repo or copying files)
为了将此脚本与我们的 Terraform 配置集成,我们将其添加到 EC2 模块:
      module "ec2_instances" {
  # ... (previous configuration)

  user_data = file("${path.module}/user_data.sh")
}
此脚本将在首次启动每个 EC2 实例时运行,设置运行 Flask 应用程序的环境。您需要根据特定的应用程序设置自定义此脚本,例如从存储库克隆应用程序代码或从存储服务复制文件。
部署一切并验证设置
要部署整个 AWS 基础设施(包括 VPC、安全组、EC2 实例和 ALB),请按照以下步骤操作:
准备您的 Terraform 配置:确保您的所有 Terraform 配置文件(vpc.tf、security_groups.tf、ec2_instances.tf、alb.tf 等)完整且正确。
初始化 Terraform:在终端导航到您的项目目录并运行:
terraform init
此命令初始化 Terraform,安装所需的提供程序并准备部署环境。
执行以下命令进行部署:
terraform apply
Terraform 将显示计划的更改。查看它们并输入 yes 以继续。此命令将创建 Terraform 文件中定义的所有资源。
验证设置:
检查 AWS 管理控制台,确保所有资源(VPC、EC2 实例、ALB 等)都已正确设置。
验证 EC2 实例是否正在运行并能与 ALB 通信。
确保安全组配置正确,允许必要的流量。
访问 Flask Web 应用
由于我们当前设置中尚未集成 Route 53,因此您将通过应用程序负载均衡器 (ALB) 的公共 DNS 名称而不是 Route 53 域来访问 Flask Web 应用程序。
查找 ALB DNS 名称:
转到 AWS 管理控制台。
导航到 EC2 仪表板并从侧边栏中选择“负载均衡器”。
找到您的 ALB 并复制其 DNS 名称。它看起来类似于my-alb-1234567890.region.alb.amazonaws.com。
访问 Web 应用程序:
打开 Web 浏览器并输入 ALB DNS 名称。
如果一切配置正确,您应该会看到 Flask 应用程序的登录页面。
<font style="v
免责声明:本内容来源于第三方作者授权、网友推荐或互联网整理,旨在为广大用户提供学习与参考之用。所有文本和图片版权归原创网站或作者本人所有,其观点并不代表本站立场。如有任何版权侵犯或转载不当之情况,请与我们取得联系,我们将尽快进行相关处理与修改。感谢您的理解与支持!


请先 登录后发表评论 ~